Lesson Overview
How to make them using WordPress
WordPress makes it possible to create, publish and monetize Web Stories endemically on the platform. By now, we all know that WordPress is a ubiquitous platform employed by millions to manage their websites, and now it has its own bespoke integration of Web Stories which helps users meet audiences across their entire owned media network of channels, instead of embedding from social accounts on their website.
We suggest that you read the WordPress Onboarding Documentation to set yourself up for success. It’s simple. Below, we’ll outline the steps and link you to the sections of the documentation that should answer any questions you may have.
What you’ll see in this Lesson:
- Installing the WordPress plug-in and getting started
- The basics of crafting a Web Story with WordPress
- Optimizing for search, monetization and analytics
Installing the WordPress plug-in and getting started
Visit the WordPress Onboarding Documentation for the full step-by-step process of installing and getting started with Web Stories for WordPress.
For an overview, first, you’ll want to locate the Web Stories plug-in in the WordPress repository. Once you have it downloaded, go to your Plugins in the account admin section and select “Add New.”
From there, you can install the Web Stories plugin and you’re nearly ready to begin crafting your first Web Story using WordPress. Navigate to the Stories dashboard and follow the steps outlined in the next sections of this Lesson and you’ll up-and-running in just a few minutes.
The basics of crafting a Web Story with WordPress
Visit the WordPress How-To Documentation and the WordPress Best Practices Documentation for the full step-by-step process of navigating the Web Stories editor and creating standout Web Stories in WordPress.
The Stories plug-in contains two main areas: Dashboard and Editor. The Editor is your Stories canvas. Here you can storyboard, create and polish stories to prepare them for publishing. From the Dashboard, you can manage, publish and optimize your content.
After reading the documentation, you’re equipped to begin making a Web Story using WordPress. The next and final step in this Lesson will ensure that you’re expertly optimizing your stories to create revenue, drive actions, and surface in search.
Reading on will also enable you to make the most of the analytics that Web Stories provide, which is yet another proof point for the power of Web Stories over other types of content.
Optimizing for search, monetization, and analytics
Visit the WordPress SEO & Optimization Documentation for the full step-by-step process of optimizing your content for SEO, monetization, and analytics.
As with all content, SEO is crucial in getting the most out of the work you put into your Web Stories. This article by WordPress also illuminates the finer points of preparing your stories for SEO in added detail.
First attach metadata to your story in the Dashboard, making sure to choose a catchy description and text excerpt. This will help your Web Story appear more prominently in search.
Then, enable AdSense and Ad Manager integrations to ensure that you’re optimally monetizing your stories.
Once you’ve done that, you’re ready to set up analytics. You can set up analytics by entering your Google Analytics tracking ID, or you can use SiteKit by Google to set up.
-
![image41_3.png]()
¿Qué es el aprendizaje automático?
LecciónAprendizaje automático para periodistas. ¿Qué aprenderá en este curso? -
![GO801_GNI_GlobalForestWatchTitle-Card.jpg]()
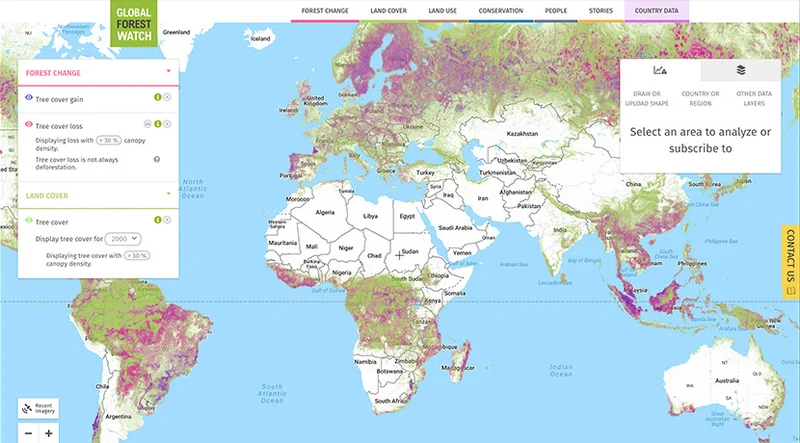
Fuente de datos: Global Forest Watch.
LecciónDatos sobre deforestación y herramientas de vigilancia. -
![gni_business_lesson_play_18]()
Aumenta tus ingresos con los productos publicitarios de Google
LecciónDetermina si AdSense, AdMob o Ad Manager es adecuado para ti